
Veggie Cooking Around the World teaches whole foods, plant-based cooking in the Chicago area
Friday, December 2, 2011
Sourdough Bread Class - Dec. 6, 2011
The participants in our December 6, 2011 wild yeast sourdough bread class at Vernon Hills High School will mix a wild yeast dough in the class and bake the bread the next day at home. They will also begin capturing wild yeast from the air. This post is for class participants to add comments and describe their adventures with wild yeast bread.
The sourdough bread class web page has links to our bread recipes.
Monday, November 14, 2011
Thanksgiving with the Three Sisters
Thanksgiving is a vegetarian holiday, especially when you invite the Three Sisters, corn,
beans, and squash. One of the participants at our Vegan Thanksgiving
class earlier this month pointed out that, when planted together,
corn provides the stalk on which the beans can climb, the beans fix
nitrogen in the soil for the corn, and the broad squash leaves shade
the ground and prevent weeds from growing. The Three Sisters also go
together nutritionally. They include a grain (corn), beans, and a
vegetable, the three pillars of a plant based diet.
Enjoy these recipes from our class. Go
to http://www.veggie-cooking.com/presentations/vegan-thanksgiving for
links to all the recipes from the class.

Pumpkin or Squash Pie
One 9 inch unbaked whole-wheat pie crust
1 pound cooked, mashed pumpkin or squash (about 3 cups)
10 ounces firm tofu
1/2 cup sweetener of choice
1/4 cup barley malt or 2 tablespoons molasses (optional)
1 1/2 to 2 teaspoons cinnamon
One to 1 1/2 teaspoons ginger
1/4 teaspoon cloves
1/4 teaspoon nutmeg or coriander
1/4 teaspoon salt
2 tablespoons arrowroot or cornstarch
1/2 teaspoon grated orange zest (optional)
Preheat the oven to 425°F. Blend all the ingredients until smooth in a food processor or in batches in a blender. Pour into the unbaked pie crust, and bake for 10 minutes. Reduce the heat to 350°F, and continue baking for an additional 40 minutes, or until the pie has risen and feels firm.
Serve either hot or cold. You can bake it several days in advance and reheat it before serving.
Miyoko Schinner, The New Now and Zen Epicure, page 205.
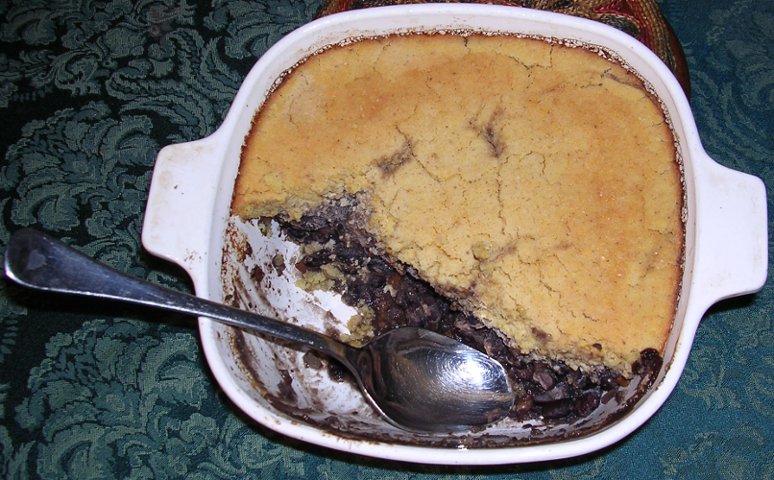
Beans and Cornbread Casserole
from The Miso Book, the Art of Cooking with Miso
John and Jan Belleme
Serves: 4 - 5| Beans | Cornbread |
| 2 cups pinto beans 5 cups water 3” piece kombu (optional) 1½ tsp sea salt 1 bay leaf ¼ tsp cayenne pepper 1 tsp cumin 2 cloves garlic, minced 1 large onion, diced 1 large carrot, diced 1 cup diced bell peppers 1 rib celery, sliced 1 Tbs red or barley miso mixed with 1 Tbs water | 1 cup yellow cornmeal 2 Tbs whole wheat flour ¼ tsp sea salt ½ tsp baking powder 1 egg, lightly beaten (optional) 2 Tbs rice or maple syrup ½ - ⅔ cup water (use greater amount if omitting egg) 1 Tbs vegetable oil |
Day before Cover the beans with plenty of water and soak over night (6-10 hours)
or
That day
Bring beans and three cups water to a boil, simmer for 2 minutes, and
soak 1 - 2 hours. Drain the beans and place in a pressure cooker* with 5
cups fresh water andkombu, if using. Cover and bring to pressure, reduce the heat, and cook 50 to 60 minutes. Allow the pressure to return to normal. (Instead of pressure cooking you may boil the beans in the fresh water until soft, 60 minutes or more.) Add the salt, bay leaf, cayenne pepper, cumin, garlic, onion, carrot, bell pepper, and celery. Simmer uncovered for 10 minutes. The mixture should be thick like chili, but not dry.
Preheat the oven to 425F. Stir the miso into the bean mixture, then pour the mixture into a 3-quart casserole. Set aside.
To prepare the cornbread topping, combine the corn-meal, flour, salt, and baking powder in a medium-sized bowl. In a small bowl, whisk together the egg, if using, along with the syrup, water, and oil. Add to the cornmeal mixture and stir until just blended. Do not overstir.
Spoon the batter over the bean mixture. (It will partially sink into the beans, but will rise as it bakes.) Bake uncovered for 20 to 25 minutes, or until the cornbread crust is firm and golden. Serve hot.

Learn How to Make the Original Bread
Almost all the bread we eat today is
made from commercial yeast, but it hasn't always been that way.
Before about 1800 everyone made yeast bread with wild yeast. Yes,
commercial yeast is convenient, but nothing can beat the taste of
wild yeast, sourdough bread. Learn how to make this tasty loaf at
our wild yeast bread class on December 6 at 6:30 PM at Vernon Hills
High School. This will be a hands-on class, so you will make bread.
To sign up call Donna at 847-932-2176 or Madeline at 847-932-2171 or
register online at www.comed128.org.
Friday, October 21, 2011
Hard Cider the Easy Way

I've always wanted to make home brew,
but I don't want to do a lot of work, so I became really interested
when I came upon Sandor Katz's recipe for quick and easy hard apple
cider in his book, Wild Fermentation. I bought a gallon of apple
cider from the Libertyville farmers market. I made sure that the
cider had no preservatives. I put the plastic jug on my kitchen
counter, took the lid off, and covered the top with a single layer of
cheesecloth, which I held down with a rubber band. Then I waited.
Since I capture yeast for my sourdough bread starter from the air in
my kitchen, I figured that the same good guy yeasts would start to
grow in the cider. I took a taste of the cider every day to monitor
the progress. During the first few days the cider was still sweet,
but definitely had some alcohol and some fizz. I knew that the yeast
was alive and well, eating the sugars in the cider and creating
alcohol and carbon dioxide. As the days went on, the cider became
more alcoholic and less sweet. On the sixth day I capped the cider
and stopped fermentation by putting it in the fridge, where the cold
temperature stops the yeast from working. It's important not to let
the fermentation go too long, because if you do, the cider will turn
sour.
Is the cider good? Take a look at the
photo. I started with the full gallon, and now it's about one half
gone, so it's obvious that I like it.
Monday, September 26, 2011
Veggie Cooking Fall Classes
Elegant Vegan Japanese Cuisine
October 4, 6:30 - 9:30 PM
Vernon Hills High School, 145 Lakeview Parkway Vernon Hills, IL
Satisfy your inner Geisha or Samurai with the ease and elegance of
preparing a plant-based Japanese style meal.
Class fees are $39 each plus an ingredient fee payable to Amy and Jim on class night.
To register contact the District 128 Community Education Program at
(847) 932-2176 or (847) 932-2171
or register on line at www.ComEd128.org
Eating Low on the Food Chain
October 8, 10:00 AM - Noon
Brookfield Zoo, 8400 31st Street Brookfield, IL 60304
How livestock damage the environment and how to help by eating more plants and less animal products.
Includes a sample mini-meal.
$35 for zoo members, $45 for non-members
To register call 708-688-8361 or
online at www.czs.org/Adult and click on the "View Schedules" button
Vegetarian, Vegan, Whole Grain ... What's It All About?
October 11, 7:00 - 8:15 PM
Indian Trails Public Library, 355 South Schoenbeck Road, Wheeling, IL
Amy and Jim will explore vegetarian, vegan, and whole grain eating in this interactive presentation.
They will compare plant-based diets to the typical American diet and discuss the advantages and
disadvantages of each. They will serve a sample vegan, whole grain mini-meal. Register by going
to http://www.indiantrailslibrary.org/, click on Calendar, go to October 11, and click on our event.
A Traditional Thanksgiving Feast-Vegan Style
November 1, 6:30 - 9:30 PM
Vernon Hills High School, 145 Lakeview Parkway Vernon Hills, IL
The class will create a savory Thanksgiving meal using traditional grains,
fruits and vegetables available to the pilgrims and the North American
First Nations peoples.
Class fees are $39 each plus an ingredient fee payable to Amy and Jim on class night.
To register contact the District 128 Community Education Program at
(847) 932-2176 or (847) 932-2171
or register on line at www.ComEd128.org
Baking Sourdough and Wild Yeast Breads
December 6, 6:30 - 9:30 PM
Vernon Hills High School, 145 Lakeview Parkway Vernon Hills, IL
Jim will share the secrets learned in his indefatigable search for the perfect
loaf of bread. He will demonstrate how to “capture” the wild yeast in your
home to make your own sourdough starter. The class will prepare sourdough
whole wheat bread and more.
Class fees are $39 each plus an ingredient fee payable to Amy and Jim on class night.
To register contact the District 128 Community Education Program at
(847) 932-2176 or (847) 932-2171
or register on line at www.ComEd128.org
How to Stir Fry With a Wok: As Easy as Prep 1-2-3
Cooking with a wok is as easy as Prep 1-2-3.
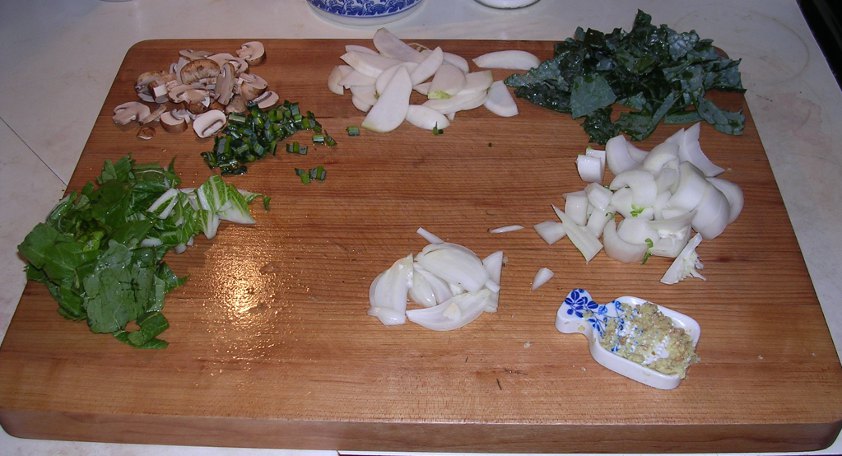
First you prep. Prepare all your ingredients for cooking. Grind and mince your spices and cut your veggies.If you are adding tofu, slice it now. Get your oil and soy sauce ready. In this photo I grated fresh ginger and sliced some onion. Then I sliced mushrooms, turnip root, bok choy, and kale.
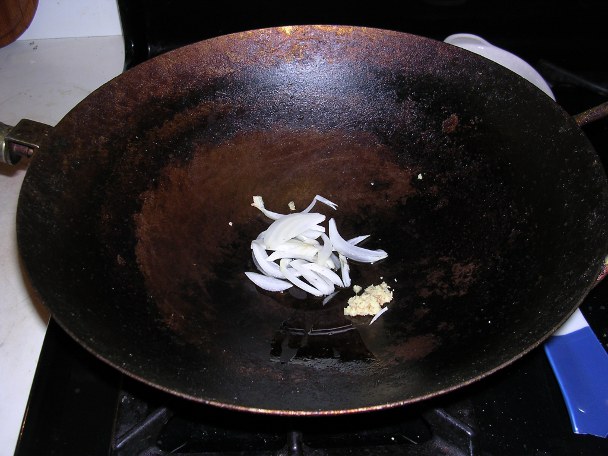
When your ingredients are ready, it's time for step 1, tempering the spices. Turn on the fire under the wok, pour in a tablespoon or 2 of oil, and put in the spices. Heat the spices for a short time to allow them to infuse the oil. Do not allow them to burn.
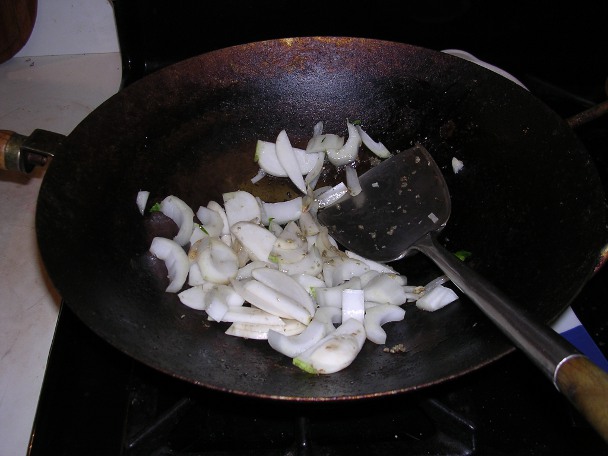
Now it is time for step 2, cooking the veggies. Start with the veggies that are cut into the biggest chunks. Cook them, stirring continuously with your wok spatula, but do not cook them completely. I started by adding the turnip slices and bok choy stalks.
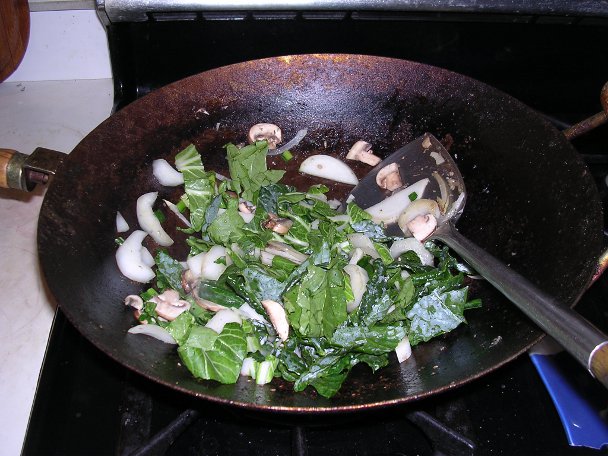
Then add the veggies that are cut into medium chunks, and finally the leafy greens. Here I added the mushrooms and kale stalks, and then the bok choy and kale greens.
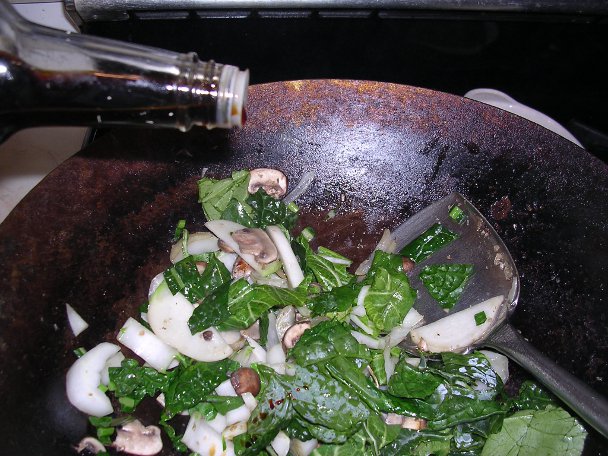
Step 3 is the easiest. Pour a splash of soy sauce into the wok and stir. Cook the food until it is slightly crisp, not overdone.
Although your wok is Chinese in origin, you can use it to cook food from any culture.
You can use Indian spices such as onions, garlic, ginger, turmeric, coriander, and cumin. For an Indian dish hold the soy sauce.
For an Italian flair use olive oil and minced garlic for step 1 and basil and balsamic vinegar or wine for step 3. Add a pinch of salt.
First you prep. Prepare all your ingredients for cooking. Grind and mince your spices and cut your veggies.If you are adding tofu, slice it now. Get your oil and soy sauce ready. In this photo I grated fresh ginger and sliced some onion. Then I sliced mushrooms, turnip root, bok choy, and kale.
When your ingredients are ready, it's time for step 1, tempering the spices. Turn on the fire under the wok, pour in a tablespoon or 2 of oil, and put in the spices. Heat the spices for a short time to allow them to infuse the oil. Do not allow them to burn.
Now it is time for step 2, cooking the veggies. Start with the veggies that are cut into the biggest chunks. Cook them, stirring continuously with your wok spatula, but do not cook them completely. I started by adding the turnip slices and bok choy stalks.
Then add the veggies that are cut into medium chunks, and finally the leafy greens. Here I added the mushrooms and kale stalks, and then the bok choy and kale greens.
Step 3 is the easiest. Pour a splash of soy sauce into the wok and stir. Cook the food until it is slightly crisp, not overdone.
Although your wok is Chinese in origin, you can use it to cook food from any culture.
You can use Indian spices such as onions, garlic, ginger, turmeric, coriander, and cumin. For an Indian dish hold the soy sauce.
For an Italian flair use olive oil and minced garlic for step 1 and basil and balsamic vinegar or wine for step 3. Add a pinch of salt.
Wednesday, September 14, 2011
Modern Chuckwagon

In August Amy and I went on a national
parks road trip. We drove from Chicago to Grand Teton, Yellowstone,
Big Horn National Forest, the Black Hills, and Badlands National
Park. We were on the road
for 28 days, camping for all but 4 nights. We cooked all our meals
outdoors, except for 3 at restaurants and 2 at the home of friends.
We ate whole grains, fresh vegetables, beans and fruit, just like at
home. How did we do it? We set up a modern chuckwagon in the back
of Amy's car that held all of our food and cooking equipment.

As you can see the chuckwagon did not
take up too much room in Amy's small SUV.

The smaller bin on the left side of the
chuckwagon was the dry food bin. It contained our whole grains such
as rice, millet, oats, barley, pasta, and flour as well as other dry
foods such as dried beans, oil, soy sauce, peanut butter, tahini,
crackers, tea, and salt. We always had plenty of trail mix in this
bin.

We put perishable foods such as fresh
vegetables and fruit, soy milk, bread, and containers of leftovers in
the cooler. We had to buy ice for the cooler about once every 2
days.

The large plastic bin on the right side
of the chuckwagon held all our cooking equipment. We brought four
pots of varying sizes and one frying pan. The pots are made out of
fairly thin steel, which allows them to pack compactly, but sometimes
caused food to burn on the bottom.

We used a Coleman 2 burner propane
stove. In 28 days we used 6 1/2 canisters of propane fuel. The
stove was a real workhorse. At Yellowstone and Big Horn, where the
temperature was often in the 30s when we got up, we appreciated that
we could cook hot cereal and soup right away. As you can see, after
a few weeks some spilled food had burnt on to the stove. I
removed it with oven cleaner after we returned home.
We usually ate breakfast in camp, and
packed a lunch of sandwiches or leftovers for the trail. Since our
chuckwagon was always in the car, we did not have to go back to camp
to eat dinner, so we usually ate at a scenic picnic spot. The photo at the top of this article is of Amy cooking dinner on the shore of Jackson Lake with the
Tetons in the background.
We were in bear country, so we had to
put all our food in the car every night. Since all the food was in
the dry food bin and cooler, all we had to do was put these 2
containers in the car.
We had little rain on this trip, but
when we did, we put up a tarp over the picnic table.
Our chuckwagon allowed us to eat the
way we wanted, while we enjoyed some of the most beautiful places in
our country.
Wednesday, June 15, 2011
Becoming Vegan Review
Becoming Vegan: The Complete Guide to Adopting a Healthy Plant–Based Diet by Brenda Davis and Vesanto Melina, Summertown, TN: Book Publishing Co, 2000.
If you are vegan, or want to become a vegan, or simply want to eat a very low level of animal–based foods, then this book belongs on your bookshelf.
Davis and Melina are registered dietitians, and this fact alone initially caused me to regard their work with suspicion. My road to becoming a vegetarian and ultimately to an entirely plant-based diet involved ignoring the advice of physicians, dietitians, and nutritional scientists, who told me throughout my childhood and young adulthood that eating animal products is necessary for health. Even today nutritional and health care professionals who accept that a plant-based diet can be healthy often can not offer any practical advice, because they were trained in and practice in an animal-eating intellectual framework. However, just as T. Colin Campbell has redeemed nutritional scientists in my eyes, and doctors such as Neil Bernard have redeemed MD’s, so Davis and Melina have redeemed dietitians. They wrote Becoming Vegan entirely within a plant-based framework. No "Eat hamburger, but if you're a vegetarian eat beans instead" advice here.
They systematically examine all the major nutritional categories: Protein, fats, carbohydrates, minerals, vitamins, and phytochemicals. They show how an entirely plant based diet can provide all the nutrients necessary for a healthy life when it is done correctly. And they show how to do it correctly. For the few nutrients where unfortified plant foods alone may be deficient – examples include vitamin B12, vitamin D for people who do not get sufficient sunlight exposure, and calcium for people who do not eat ample quantities of greens and beans – they recommend vegan supplements or fortified plant foods.
Then comes the "different strokes for different folks" part of the book. Not all vegans have the same nutritional needs, so Davis and Melina thoroughly and systematically examine the nutritional requirements for children, adults, seniors, people who are overweight, people who are underweight, and athletes. They have a heartfelt chapter on the needs of vegans with eating disorders.
Davis and Melina base their book on science, not speculation; on fact, not opinion. They also have a respect for and identification with those who would eat a plant-based diet, whether for health, to reduce our impact on the environment, or to relieve the suffering of animals.
Monday, May 16, 2011
Supercharged Oatmeal Breakfast

When my mom was a little girl her father got up early every morning and made a big pot of oatmeal for the entire family for breakfast. My grandfather had good nutrition sense. Oatmeal was one of the few whole grains that was readily available and frequently eaten in the typical American diet. I would not agree with having oatmeal every day – variety is the spice of life – but oatmeal is a frequent visitor to my breakfast table. Here is a breakfast that takes oatmeal to a new nutritional and taste level.
Let's start with the cereal. The night before take one cup of whole oats and 1/2 cup of whole barley, rinse and put in a large pot with 5 cups of water and one or two pinches of salt. When I say whole oats and barley, I mean whole. Not rolled, not cut. You can buy them at Whole Foods in the bulk section. The labels will probably read "oat groats" and "hulled barley". Bring the water to a boil. If you have time, let it simmer for 10 or 15 min. Then turn off the heat and leave the lid on the pot. The next morning the oats and barley should be mostly cooked. Add water if necessary to bring your oatmeal to the consistency that you want. Then bring it to a boil again.
Top your oatmeal with raisins and ground flaxseed. Raisins help prevent calcium from leaching out of your bones [1], and flaxseed is the plant kingdom's champion source of omega-3 fatty acids [2].
Pair your oatmeal with a lettuce, carrot, and radish salad. Top the salad with a simple dressing made from flaxseed oil (more omega-3's here), olive oil (high in monounsaturated fats), and balsamic vinegar.
[1] Amy Lanou and Michael Castleman, Building Bone Vitality, (New York: McGraw Hill, 2009), 197.
[2] Brenda Davis and Vesanto Melina, Becoming Vegan (Summertown, TN: The Book Publishing Company, 2000), 70.
Sunday, May 1, 2011
Indiana Jones and the Channel of Destruction

Put on your Indiana Jones hat and come with me. We are going on a great adventure. We will start at the gaping, cavelike mouth of the Channel of Destruction. Don't worry. Your Indiana Jones hat has strong protective powers and will keep you safe.
As we enter the Channel of Destruction we see a huge sleeping slug on the bottom of the cave. Watch out! The slug is moving. Oh, no! It has knocked off your Indiana Jones hat and and now you are vulnerable. Now the jaws of the cave close on you and cut you into chunks. Then stalactites and stalagmites come together and grind you into smaller pieces. A strange liquid oozes from the walls of the cave and mixes with the pieces of your body. Then the slug makes a surging movement and you feel yourself entering a dark vertical tube. Pushed along by contractions of the side of the tube, in a few minutes you enter the acid bath. It is like a washing machine, only the water is extremely acid. It churns you around and begins to dissolve your chunks of flesh. Then your mushed up body is pushed into another tube, where powerful enzymes tear apart your flesh, sugars and fat. The walls of the tube suck up these your nutrients, leaving you as nothing more than waste products, fiber, and water. Then you are pushed forward to another tube where most of the liquid is sucked out of you. This tube is filled with lethal bacteria. Finally a violent contraction expels you back into the outer world. You are now a foul-smelling, bacteria-ridden, brown blob. No one wants to talk to you or even be close to you. You feel like a piece of poop, because that is what you have become.
The Channel of Destruction is your own digestive tract. This scary process is occurring right now inside you. No wonder most of us don't want to think about it. But how can we make head or tail of the conflicting views on diet and nutrition that we find all around us unless we have a basic understanding of our own digestive process? If you're like me and never took biology in school, or if you did take biology and vacuumed your brain the minute you walked out of the final exam, then it's time for you have to brush up on what your gut is doing.
I brushed up on what was happening inside my gut by watching the videos in Understanding the Human Body: An Introduction to Anatomy and Physiology by Dr. Anthony Goodman. You can probably get this series at your local library.
Wednesday, April 27, 2011
A Moroccan Meal

Chutzpah, audacity, brass, gall, and nerve. That's what you need to jump in and try a new style of cooking. Amy had all of the above when she decided to try Moroccan cooking. We have never been to Morocco and knew practically nothing about Moroccan cuisine, but she got a Moroccan cookbook, Cooking Moroccan by Tess Mallos, and jumped in.
The centerpiece of her Moroccan meal was the tagine, a long cooked Moroccan stew. Most tagines have meat, but she was able to find one that was based on lentils and squash. See the recipe here. She also made spiced carrots (recipe here) and roasted vegetables with prunes (recipe here).
Moroccan food emphasizes long, slow cooking or stewing. It uses elaborate spice mixtures, including cinnamon, cumin, coriander, ginger, and turmeric. The spices are combined with onions and/or tomatoes, olives, and salted lemons, or with fruits.
We also had hummus, garnished with hot peppers and onions. Okay, hummus is really more Arabic than Moroccan, but I like it.
Then there was the bread. Moroccan bread is traditionally made in flat loaves with little or no salt. It is traditionally a wild yeast (sourdough) bread. It was a perfect fit for my basic whole wheat, sourdough pita recipe. I made three loaves of different sizes, so we could find out which one we liked best. The loaves puffed up like pita bread, but since this is apparently not in the Moroccan tradition, in later versions I scored or punctured the tops of the loaves to allow steam to escape.
We enjoyed the meal, but decided that it will be more balanced if we add a salad next time.
Amy and I have both incorporated Moroccan food into our cooking. You can, too. See you on the road to Morocco.
Tuesday, April 26, 2011
Welcome
Welcome to the Veggie Cooking Around the World blog. My partner Amy and I started Veggie Cooking Around the World, LLC in January. Our mission is to teach whole foods, plant-based cooking in the Chicago area. This blog will focus on cooking, menu planning, and eating delicious whole grains, fruits, veggies, and beans. We are convinced that a healthy diet is not boring. In fact, agricultural societies around the world offer us a huge variety of delicious meals. I hope that you enjoy this blog. Feel free to comment on our posts.
Subscribe to:
Posts (Atom)